Pac-Man
By Xianmin Zhao (xz764) and Rufei Ye (ry276)
Fall 2022 ECE5725 Project
Demonstration Video
Introduction
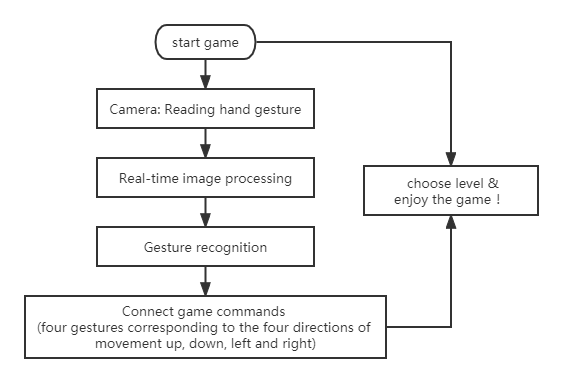
In the project, we expanded the classic Pac-Man game with gesture controls. The design replaces the original keyboard operation with hand movements to control the direction of Pac-Man's movement. The four gestures correspond to the four directions of up, down, left and right. In the first step, a Pac-Man game was designed with pygame. It has three levels: learning, easy level and hard level. Next, to complete the real-time gesture recognition part, PiCamera, computer vision and OpenCV are used. Finally, the game module and the gesture recognition module were connected through specific command files in linux( Raspberry Pi).
Project Objective:
- Design a basic Pac-Man game.
- Realize the recognition of hand gestures.
- Control Pac-Man game with hand gestures: the four gestures correspond to the four directions of up, down, left and right.
Design & Testing
Phase 1 Pac-Man Game
First of all, we draw the start screen of the game. There are three buttons on the page: "Learning", "Easy Mode" and "Hard Mode". Clicking different buttons will jump to the corresponding level. During the game, each time the player presses the "enter" key on the keyboard, it will return to the game's start screen. The start screen is shown below.
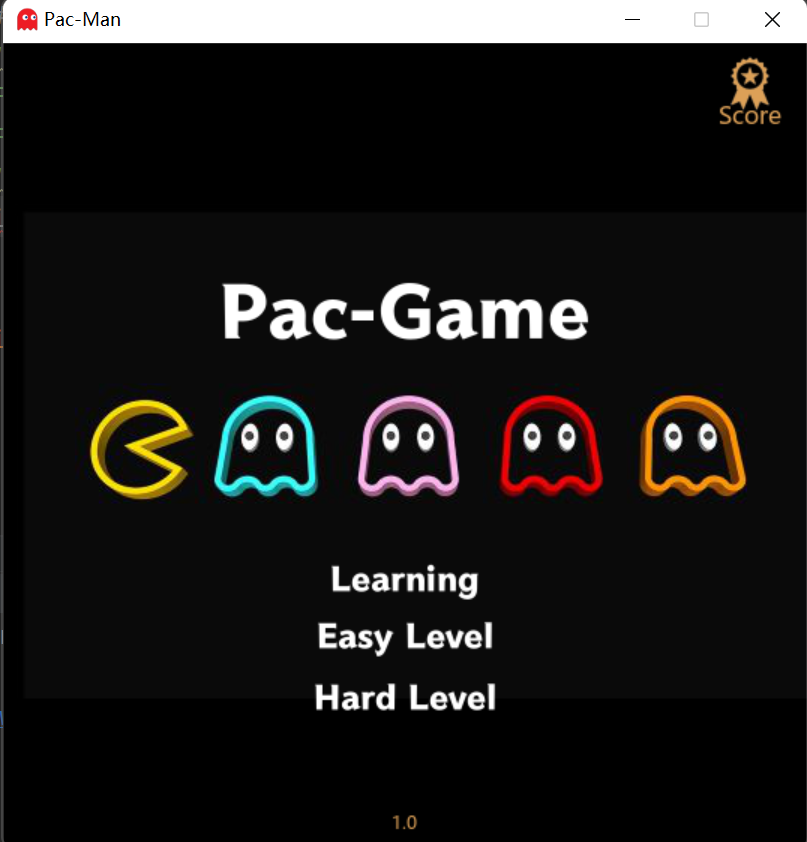
Figure 1: Pac-Game Interface
The game is divided into three levels. The map of learning mode consists of two squares and there are no monsters. The purpose of learning mode is to familiarize players with the direction of movement corresponding to different gestures. After the player is familiar with the game, the player can press the "enter" button at any time to exit back to the initial interface to start the official level. Considering the difficulty of gesture control, both easy mode and hard mode have only one ghost. The difference between the two modes is only the map and the ghost track.
The flow chart of the game writing is shown below. In these three levels, we first need to set the position of the wall and the gold coins. Then we should define the initial position of the ghost and the player. For ghost trajectory writing, an array is defined to store for controlling the ghosts to complete a path and restart a new round of path. For the control of the hero movement, we first use the up, down, left and right keys of the laptop keyboard. If the hero hits a wall, the hero will stay in place and will not go through the wall. This is achieved by using "pygame.sprite.spritecollide". Using the same method, we can check if the heroes have eaten any gold coins. If they meet, the coin disappears and the score in the upper left corner of the screen is increased by one point. If the hero meets a ghost, the game is over. If the hero eats all the coins but does not meet the ghost, the player wins.
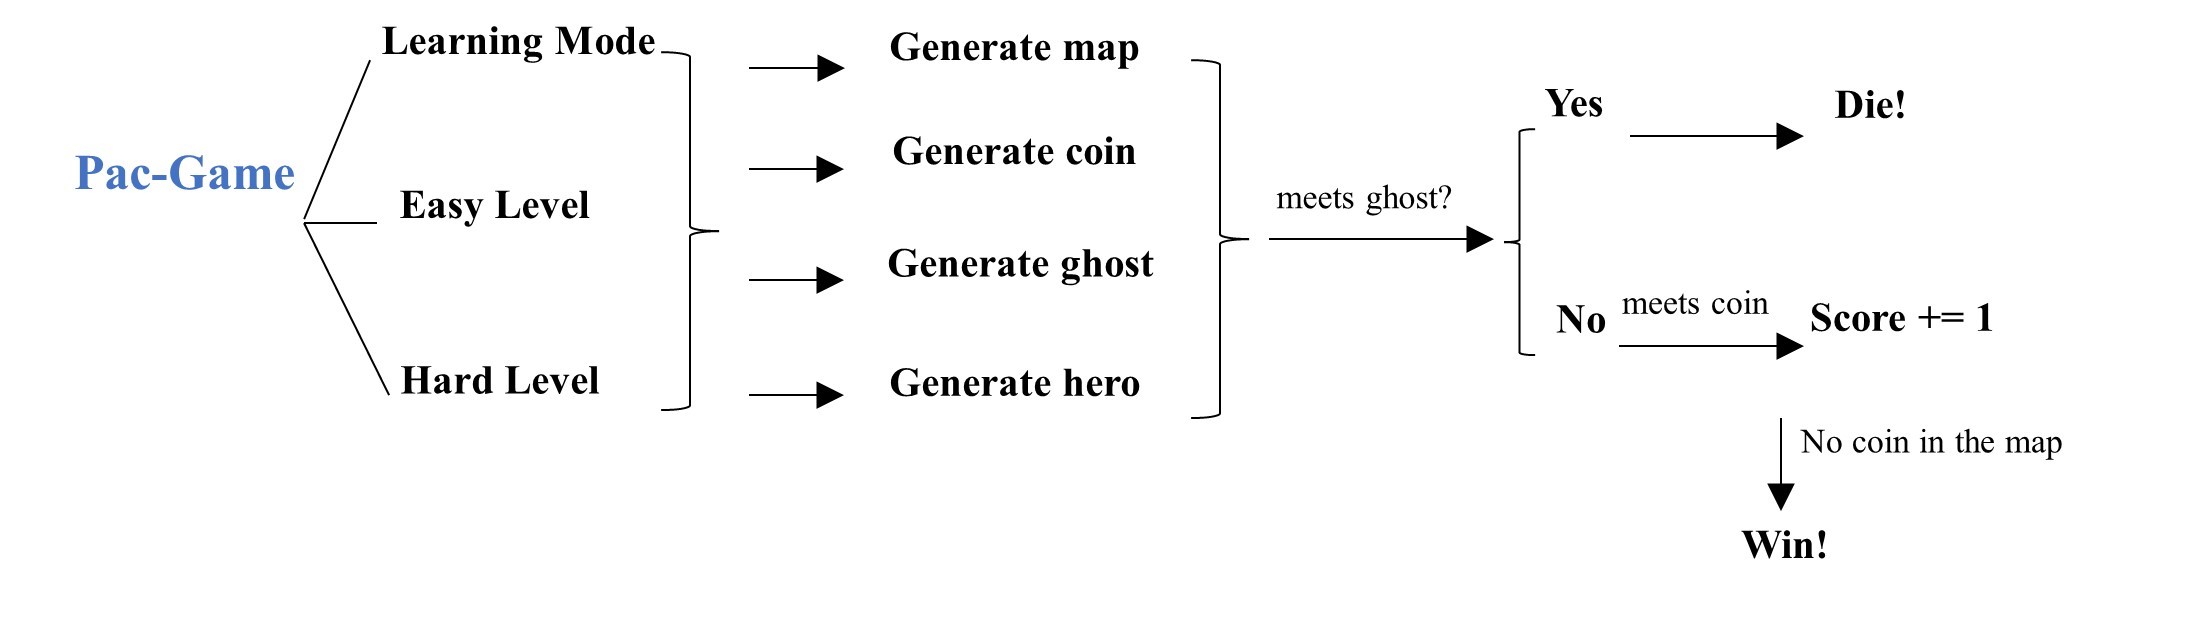
Figure 2: Flow chart of Pac-man game
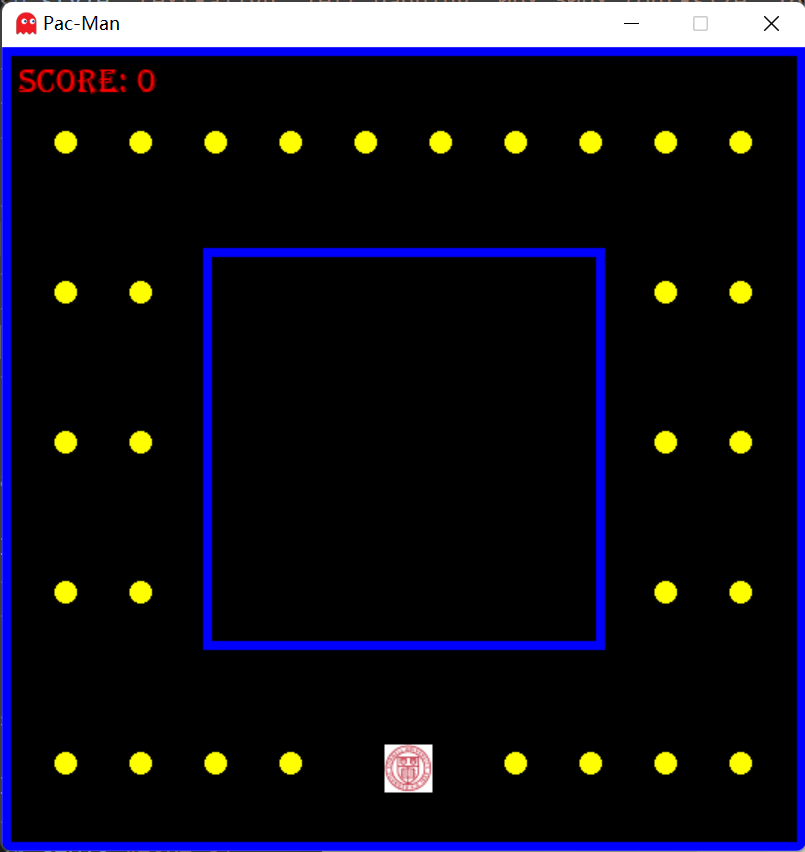
Figure 3: Learning mode
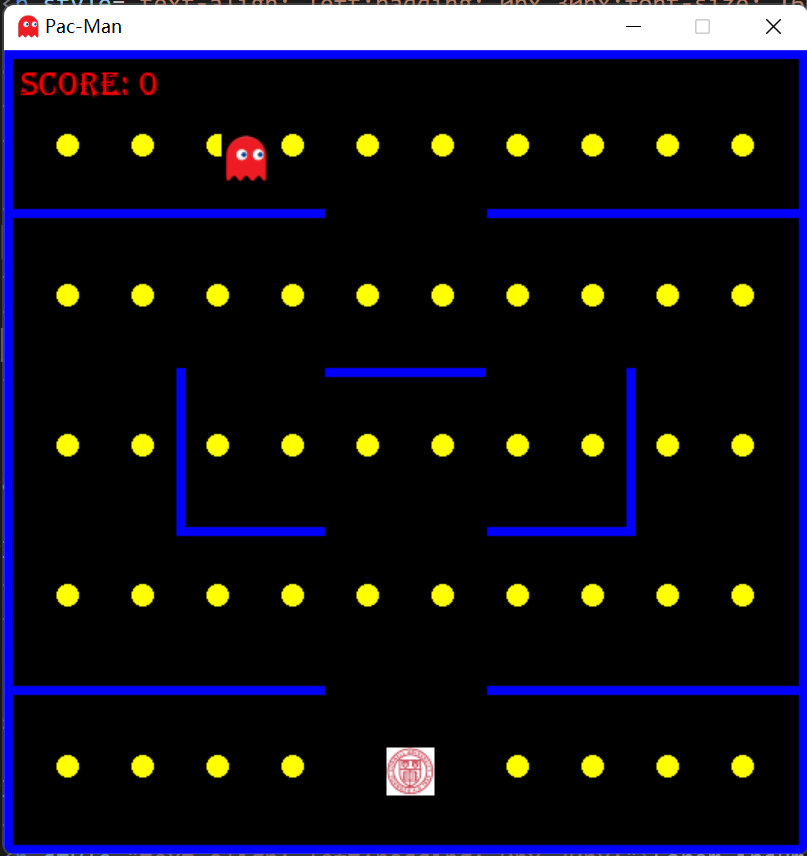
Figure 4: Easy Level
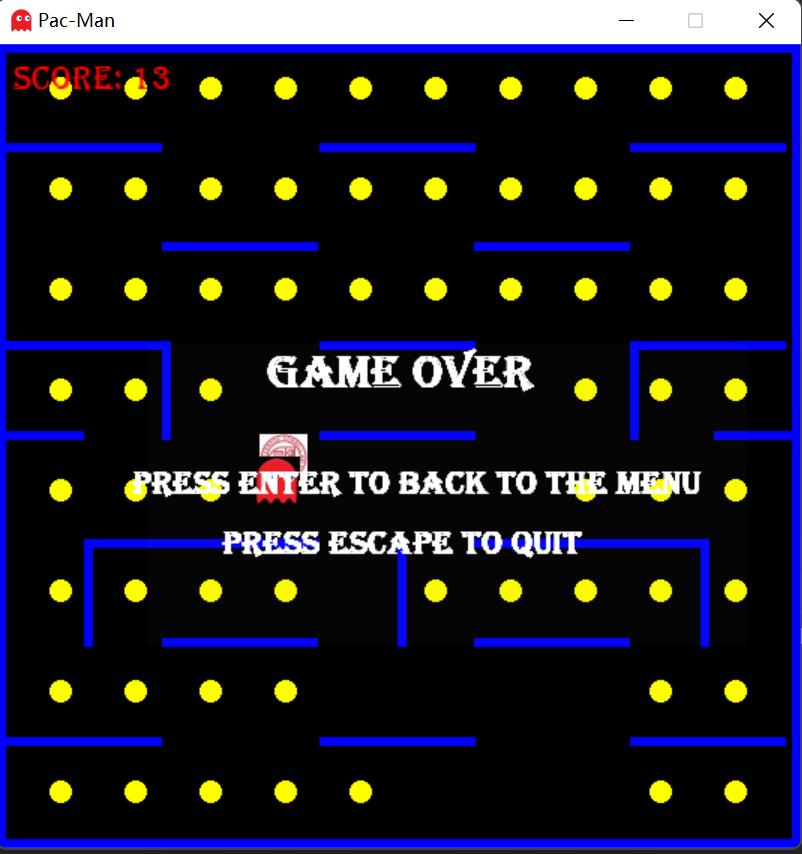
Figure 5: Win Page
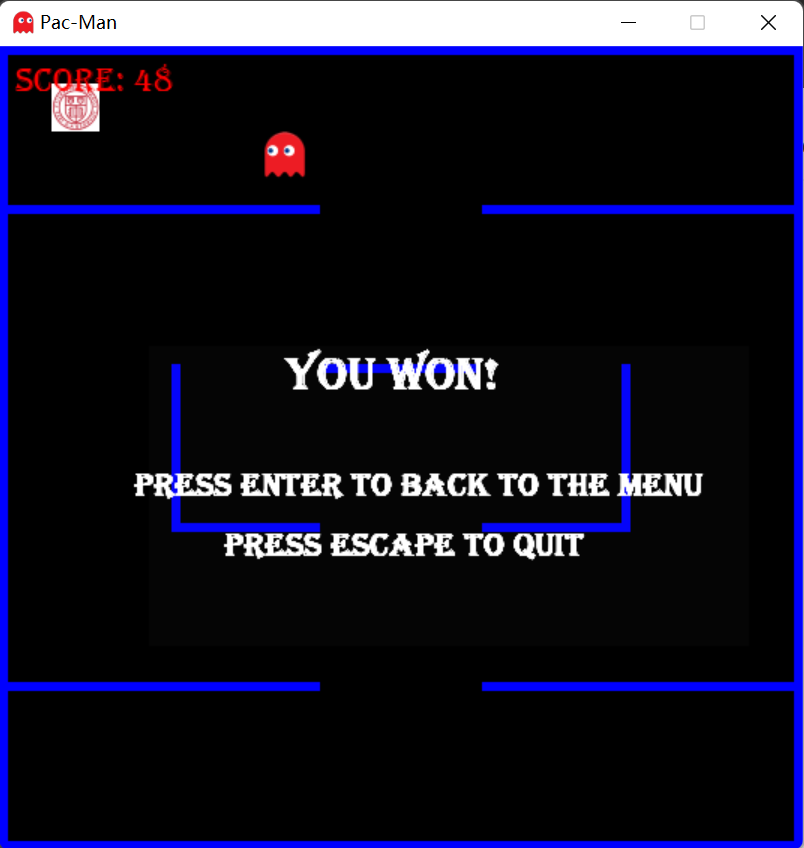
Figure 6: Hard Level & Game Over Page
Phase 2 Gesture Recognition
The design logic of the image processing section is based on what was learned in ECE5470 Computer Vision. When testing, we set five windows to show each important process of the image. After discussion, we designed to use the number of fingers as a criterion to judge the player's movement. The calculation of fingers is a newly designed function based on the output of Opencv's cv2.convexityDefects.
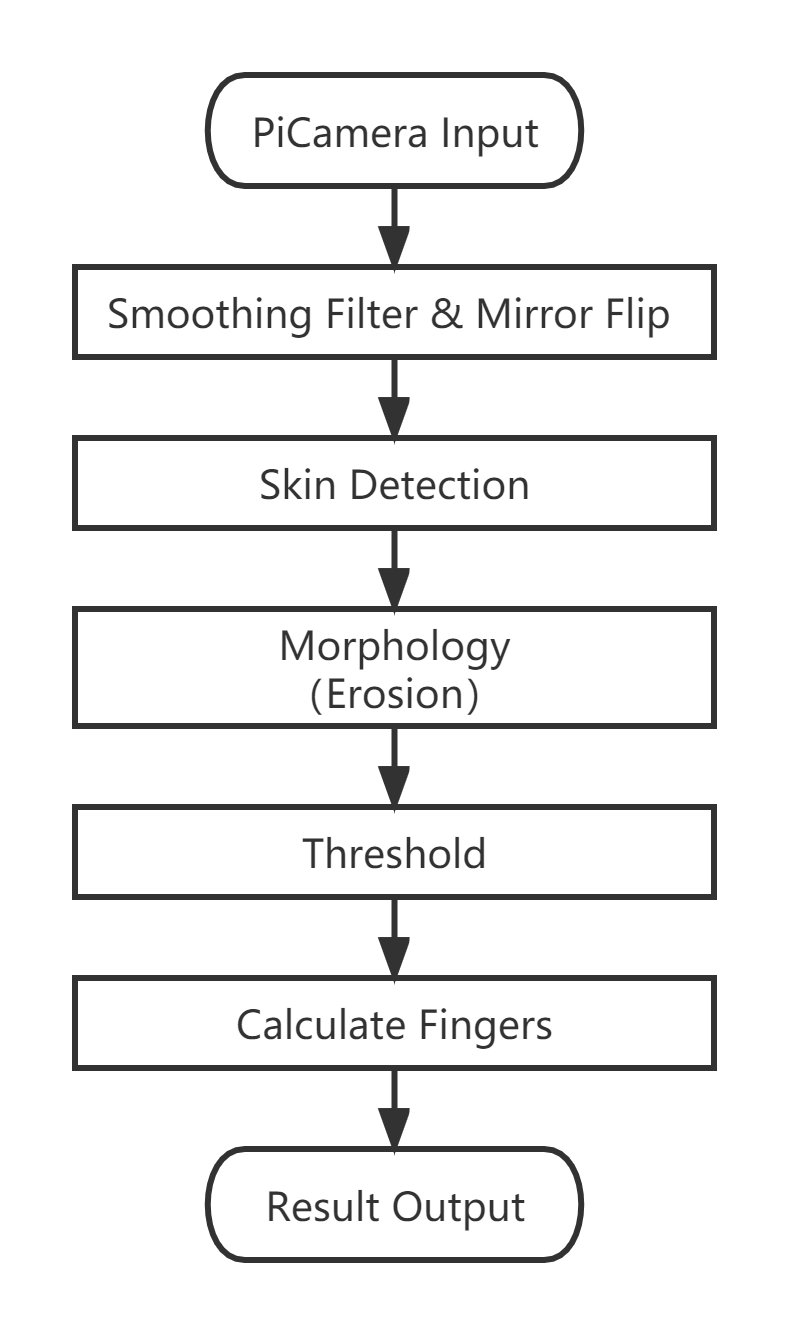
Figure 7: Flowchart of gesture detection
Gesture Detection Video
1. PiCamera Input and Initialization
In the project, although we used PiCamera to acquire real-time images, the main image processing was done using Opencv. In the first week, we successfully completed the hardware installation of PiCamera and the software installation of Opencv. We have confirmed that the hardware is available by using linux commands and python respectively.
As the flowchart shows, the first step in gesture recognition is to read the input image and perform some simple initialization operations. After trying different filters, bilateralFilter is chosen because it can preserve the edge information of the image well. Moreover, we mirrored and inverted the camera screen to give users a better view of themselves. We delineated the region of interest in the camera frame - the hand. the ROI delimits the scope of the next step of image processing.
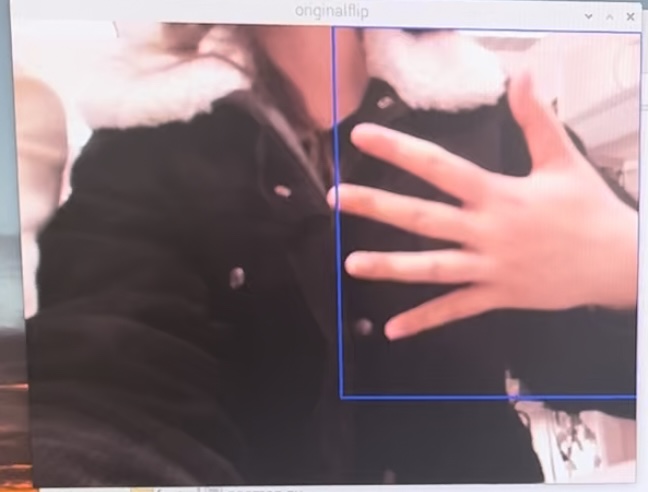
Figure 8: the flip screen after filtering
2. Skin Detection
Next, we initially planned to perform a threshold operation based on color to initially isolate the shape of the hand. In this step, we spent a week to repeatedly modify the function model and debug the parameters.
At first, we chose a threshold based on HSV color space, i.e., we set separate thresholds on the three hues of red, yellow and blue. However, the thresholding results were not stable because the hand color was variable in different lighting environments. (In particular, PiCamera is sensitive to light, which makes the results even more unsatisfactory.)
Later, we converted the image to YCrCb color space for processing. Compared to RGB and HSV color models, YCrCb reduces the interference caused by luminance variations. (Y represents the luminance, Cr represents the red component of the light source, and Cb represents the blue component of the light source). Based on the values of Cr, Cb, threshold each pixel point. This method is more effective than the HSV method, but will be slower.
After consulting the reference material, we finally decided to threshold the Cr channel alone. In addition, opencv's thresholding function provides a variety of thresholding methods. After trying and reflecting, we chose Otsu thresholding, which avoids having to choose a value and determines it automatically.

Figure 9: the image after skin detection
In addition, we tried another approach: combining the elliptical model and YCrCb space. Although it worked well, it was slow enough to almost get stuck on the laptop, especially when used on the Raspberry Pi.
3. Morphology and Threshold
Morphology includes erosion and dilation of the image. The morphology process is used to reduce white dots in the background and black dots displayed on the hand. To make it easier to calculate the fingers later, we eventually removed the dilation part in order to preserve (enlarge) the gap between the fingers as much as possible. Similarly, in order to obtain the proper convolution kernel, we have performed debugging on the laptop and Raspberry Pi respectively.
Finally, convert the image into a binary image.
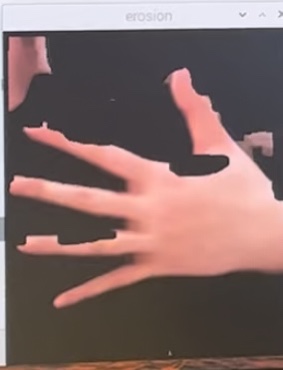
Figure 10: the image after erosion
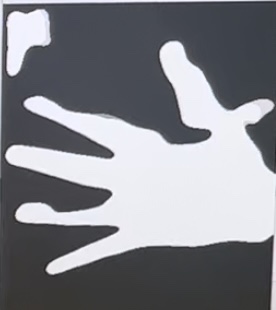
Figure 11: the image after threshold
4. Calculate Fingers Function
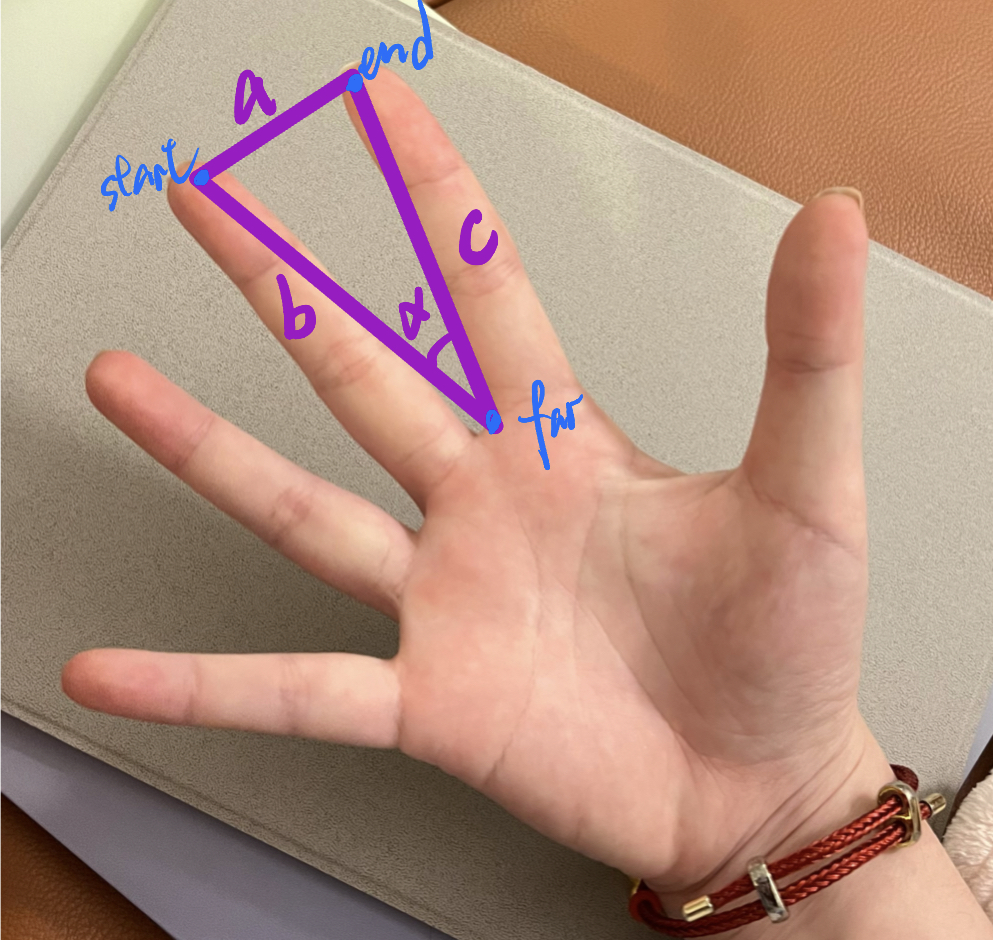
Figure 12: Finger Calculation Schematic
The calculation of the number of fingers is based on the cosine theorem. The defect of the object, i.e. the finger slit, is detected by Opencv's cv2.convexityDefects function. As shown in the figure, the function returns the coordinates of the three blue points. From the blue points, we calculate the lengths of the three sides of the purple triangle and then calculate the angle of the finger slit by using the cosine theorem. If the angle exists and is less than 90 degrees, then the slit is marked and counted.
The calculation function returns the number of detected finger slits. The correspondence between finger, point and hero movements is shown in the following table.

Figure 13: The correspondence between finger, point and hero movements
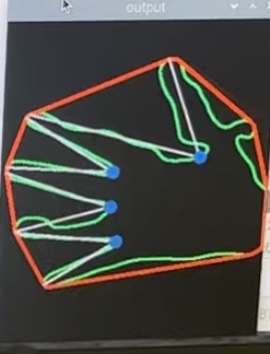
Figure 14: the result of calculation function: five fingers, four points
Phase 3 Integrate gesture detection with the pac-man game interface
The last part is to combine Pac-Game and gesture detection. In this part, we at first encountered great difficulties. We first spliced Pac-Game and gesture detection directly, so that the hero could get the direction generated by gesture detection directly. However, such an operation would make the whole interface very laggy, and the hero's movement could not keep up with the gesture movement at all. At the suggestion of the professor, we chose to build a bridge between Pac-Game and gesture detection.
A simple way to do this is to use "touch" to generate an empty file in the current folder for each gesture change (for example, use "touch left.txt" to generate "left.txt"). On the other side, the code in Pac-Game constantly detects if a new file is created. Once the corresponding file is detected, the action corresponding to the file name will be executed. After executing the action, it will immediately remove the file that has been executed. In this way, a bridge is built between Pac-Game and gesture detection. The flowchart below shows the two parts of the operation when making the hero to the left.
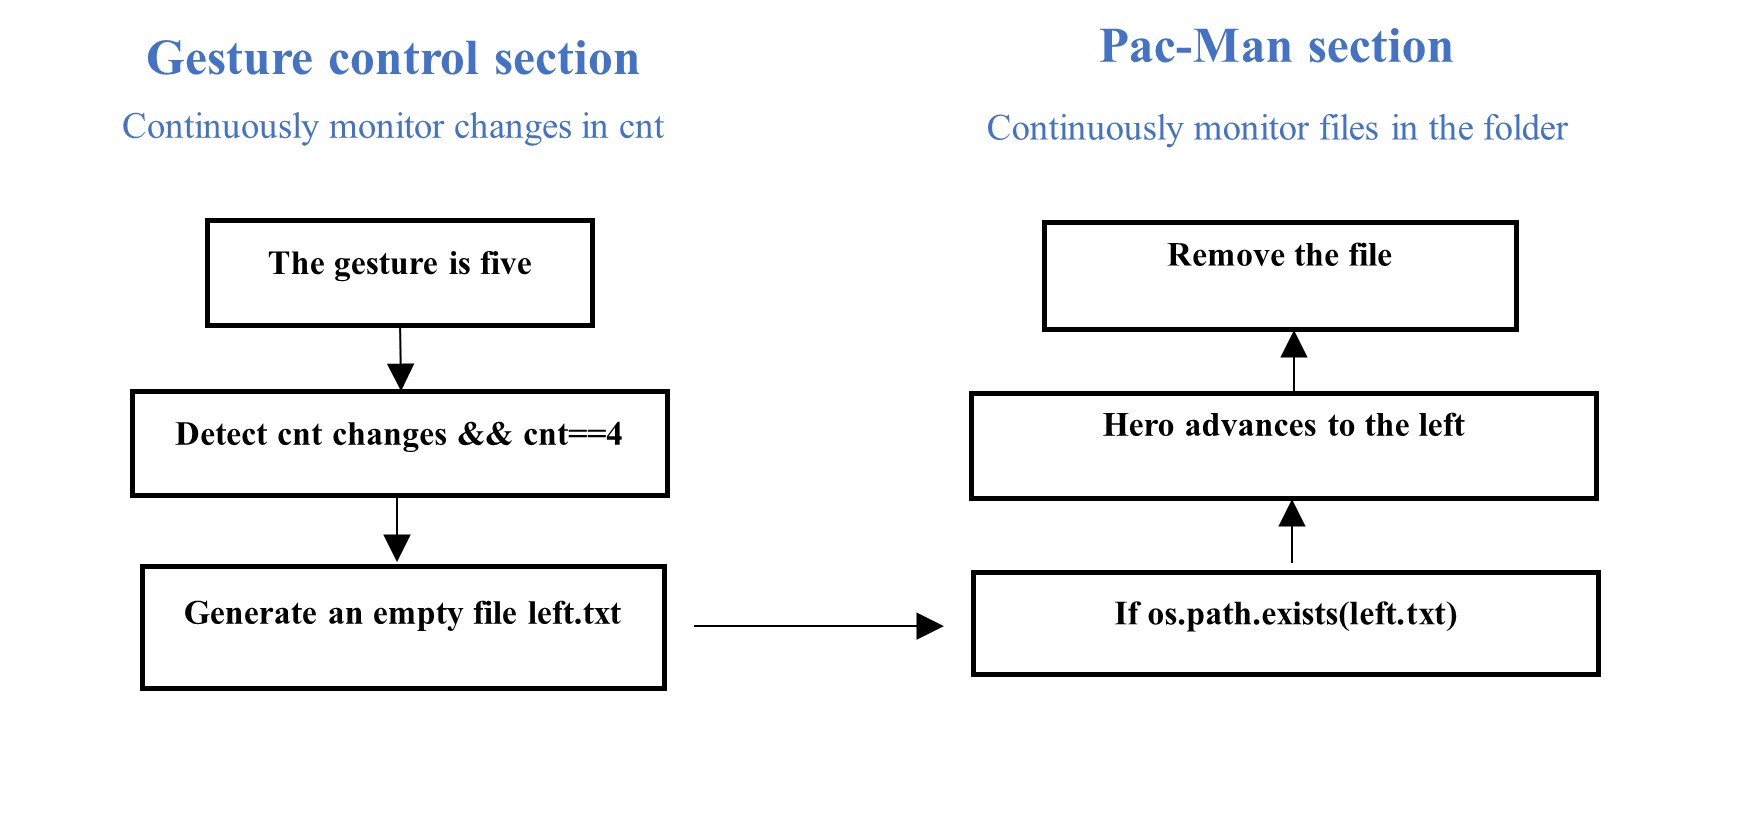
Figure 15: Flow chart of gesture detection combined with Pac-man game interface (example when letting hero move to the left)
By writing the bash file it is possible to run both the Pac-man part and the gesture recognition part. The runtime diagram are shown below.
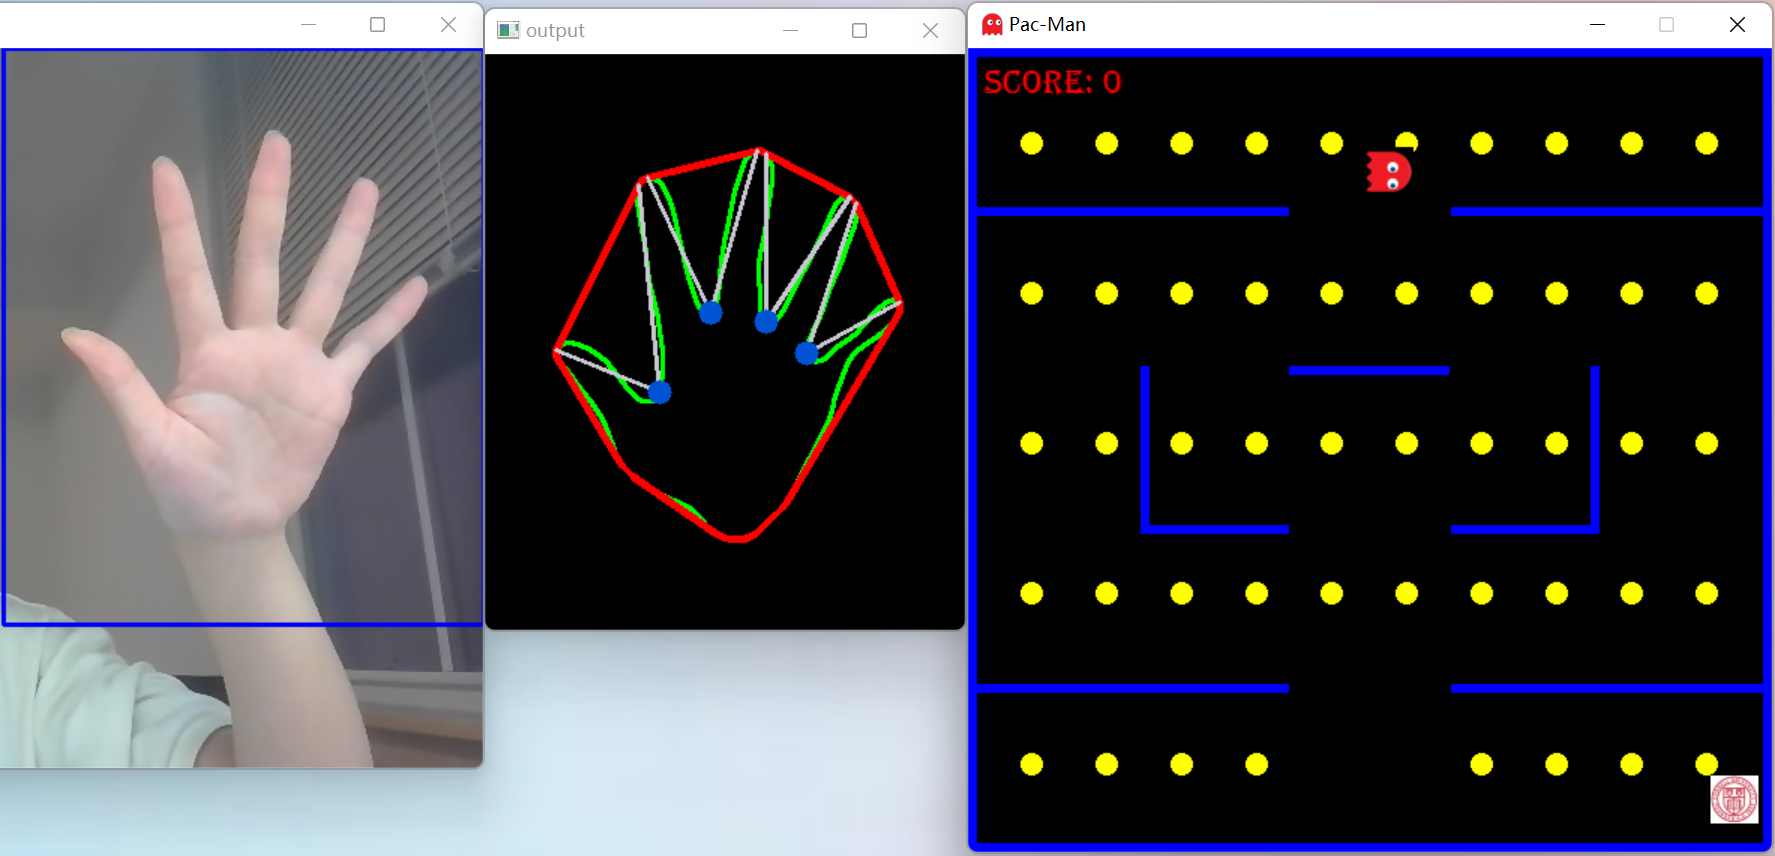
Figure 16: Integration of gesture detection with the pac-man game interface
Result
Overall, we accomplished our initial goals and had a lot of fun designing the game. At first, we completed the rough design on our own laptop. Later, we further debugged the parameters in the lab in conjunction with the lab environment.
Although the game setup is not as complete as the classic version, we finally achieved the goal of playing Pac-Man games with gestures.
Compared with the classic Pac-Man game, our game design may be relatively simple. But gesture recognition is not as sensitive as keyboard control, and in addition to algorithmic delays, human responsiveness needs to be taken into account. If we have more time, we can try to perfect this game more.
Conclusion
We first designed pac-game. The game has an initial interface, which the player can enter three levels of different difficulty. The heroes of the game are controlled by different gestures. Gesture detection is divided into several steps: picamera initialization, skin color detection, morphology and threshold. After the gesture detection step, it will display two boxes on the screen, showing the initial image and the processed image. Then we connect the pac-game and gesture detection. The user can control the hero freely by gesture, which is very effective.
Future Work
If we had more time, we could further improve the game to make it more fun and interactive!
1. Improve the game content: On the one hand, add user input interface and game performance ranking. On the other hand, optimize the action route of ghosts or increase the number of ghosts to make the game more challenging.
2. Enhance player experience: Fixing the PiCamera position; setting up self-boot on the Raspberry Pi.
3. Set Bonus of the game.
Work Distribution
Project group picture
Xianmin Zhao
xz764@cornell.edu
Designed the basic Pac-man game.
Completed module connection and webpage creation.

Rufei Ye
ry276@cornell.edu
Designed the gesture detection.
Completed module connection and webpage creation.
Parts List
- Raspberry Pi
- Raspberry Pi Camera
- SD card
All are Provided in lab
Code Appendix
File name: Begin
  #!/bin/bash

  python3 /home/pi/Final/pacman_start.py&
  python3 /home/pi/Final/stepbystep.py